How to Create & Share a Photo Album on iPhone — Complete Guide 2026
Wondering how to create a shared album on iPhone, or how to share a photo album on iPhone with friends and family? iPhone's Shared Albums feature is built right into Photos — and this guide covers everything: how to make a shared album on iPhone step-by-step, how to join a shared album someone sent you, and how to invite someone to a shared album on iPhone.
We'll also explain why shared albums often fall short for events like weddings and parties — where you need guests on both iPhone and Android to upload photos in real-time — and show you a faster alternative that actually works.
How to Create a Shared Album on iPhone: Step-by-Step
Here's the complete process for how to make a shared album on iPhone. These steps work on any iPhone running iOS 16 or later:
Step 1: Enable Shared Albums
Before you can create shared albums, you need to ensure the feature is enabled:
- Open Settings on your iPhone
- Tap your name at the top
- Select iCloud
- Tap Photos
- Toggle on Shared Albums
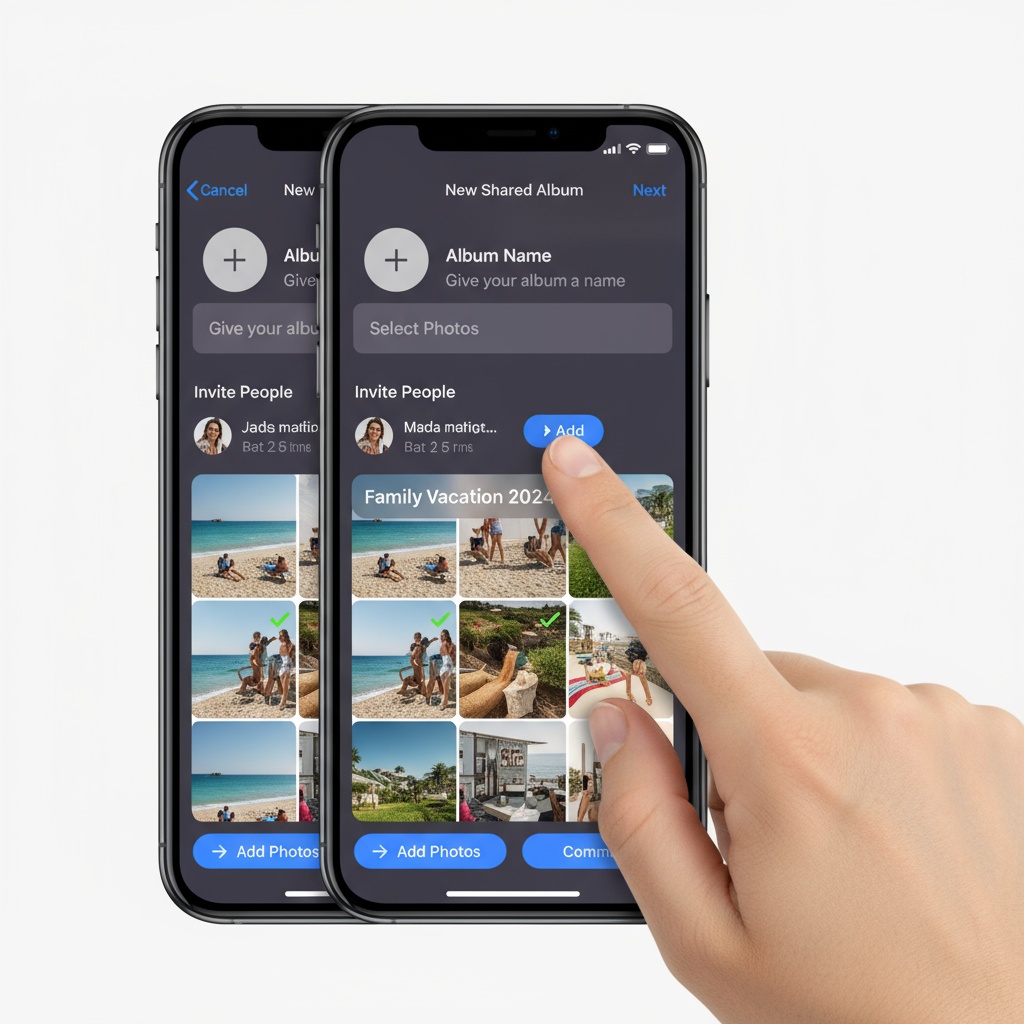
Step 2: Create Your Shared Album
- Open the Photos app
- Tap Albums at the bottom
- Tap the + icon in the top-left corner
- Select New Shared Album
- Give your album a name (e.g., "Sarah & Mike's Wedding")
- Tap Next
Step 3: Invite People to Your Shared Album
- Enter email addresses or phone numbers of people you want to invite
- Tap Create
- Your invitees will receive a notification to join the album
Step 4: Customize Sharing Settings
- Open your newly created shared album
- Tap People tab
- Enable options like:
- Subscribers Can Post: Let others add photos
- Public Website: Create a web link anyone can view (but not upload to)
- Notifications: Get alerted when photos are added
Step 5: Share the Album Link
Once created, you can share the album by:
- Opening the shared album
- Tapping People
- Selecting Invite People or Share Link
- Sending the link via text, email, or messaging apps
How to Join a Shared Album on iPhone
Received an invitation to someone's shared album? Here's how to join a shared album on iPhone:
- Open the Photos app
- Go to the Albums tab
- Look for a notification at the top, or scroll to Shared Albums at the bottom
- Tap the album invitation
- Tap Accept to join
If you don't see the invitation, check that Shared Albums is enabled in Settings > Your Name > iCloud > Photos > Shared Albums. You can also ask the album owner to resend the invite to your Apple ID email address.
Note: You must have an Apple ID and an Apple device to join and contribute photos to a shared album. Android users cannot join iPhone shared albums.
How to Invite Someone to a Shared Album on iPhone
Want to add more people after creating your album? Here's how to invite someone to a shared album on iPhone:
- Open the shared album in the Photos app
- Tap the People icon (person with a +) at the top
- Tap Invite People
- Enter their email address or phone number (must be associated with an Apple ID)
- Tap Add
The person will receive a notification to accept the invitation. You can add up to 100 subscribers to a single shared album. To remove someone, go to the People tab, tap their name, and select Remove Subscriber.
How to Share a Photo Album on iPhone via Link
If you want to share your album with people who don't have Apple devices — or just want an easier sharing method — you can create a public web link:
- Open your shared album
- Tap the People icon
- Toggle on Public Website
- Tap Share Link to copy or send the URL
Anyone with the link can view photos in a web browser, but they cannot upload photos. This is view-only access. For two-way photo sharing across all devices, you'll need a cross-platform solution (more on that below).
The Reality: Why iPhone Shared Albums Fail at Events
While iPhone Shared Albums work in theory, here's what actually happens at real events:
The Setup Barrier: Every guest needs:
- An Apple device with iOS or a Mac
- An Apple ID signed in
- Shared Albums feature enabled in iCloud settings
- The Photos app properly configured
- Email or notification access to receive your invitation
At your wedding or party, you'll watch as guests struggle through these steps instead of celebrating with you.
The Upload Friction: Even after setup, uploading requires:
- Opening the Photos app
- Navigating to Shared Albums
- Finding your specific album
- Selecting photos manually
- Tapping "Add" for each batch
Compare this to scanning a QR code once and uploading instantly—no wonder participation drops off.
Platform Limitations:
- Android users are completely left out
- Non-Apple device owners can only view, never upload
- At most events, 30-40% of guests can't participate at all
Storage and Quality Restrictions:
- Maximum of 5,000 photos per shared album
- Videos limited to 15 minutes each
- Photos reduced in quality if they exceed limits
- Album creation count capped
The Better Alternative: QR Code Photo Sharing
Modern event photo sharing has evolved beyond the limitations of iPhone Shared Albums. Instead of requiring specific devices, apps, or accounts, QR code photo sharing works instantly for everyone.

How It Works
- One QR Code: Create a single QR code for your event
- Scan & Upload: Guests scan it with any smartphone camera (iPhone or Android)
- Instant Access: Photos upload directly through their web browser—no app download required
- Real-Time Display: Photos appear immediately on screens during your event
Why Fotify Outperforms iPhone Shared Albums
Universal Access: Works on any device with a camera—iPhone, Android, or tablet. No Apple ID, account creation, or app downloads needed.
Instant Participation: Guests scan once and they're in. No settings to configure, no albums to find, no invitations to accept.
Real-Time Engagement: Unlike shared albums which guests might check later (if ever), Fotify displays photos live during your event on TVs or projectors. This creates immediate excitement and encourages more uploads.
Better Features for Events:
- Live photo wall displays that update in real-time
- Content moderation to keep displays appropriate
- Unlimited photo uploads (no 5,000 photo cap)
- Works for weddings, corporate events, birthdays, and parties
Post-Event Access: After your event, share a link so guests can revisit and download all the photos—something iPhone Shared Albums struggles with when you have hundreds of participants.
When iPhone Shared Albums Still Make Sense
Despite their limitations for events, iPhone Shared Albums work well for:
- Small family sharing: Sharing photos with 3-5 family members who all have Apple devices
- Ongoing photo streams: Creating a long-term album that updates over months
- Private, non-event sharing: Sharing vacation photos with friends after the trip
For live events where you want maximum participation and engagement, dedicated event photo sharing platforms deliver far better results.
Setting Up Fotify for Your Event (2 Minutes vs 2 Hours)
Instead of spending your event troubleshooting why half your guests can't access your shared album, here's the Fotify approach:
- Create your event at dashboard.fotify.app (30 seconds)
- Download your QR code (10 seconds)
- Display it at your event on signs, tables, or screens (1 minute)
- Watch photos appear live throughout your celebration
No technical support needed. No "Can you resend the invitation?" No "I don't have an Apple ID." Just instant photo sharing that actually works.
Comparing Your Options
| Feature | iPhone Shared Albums | Fotify |
|---|---|---|
| Setup time for guests | 5-10 minutes | 5 seconds |
| Works on Android | View only | Full upload access |
| Requires app download | Yes (Photos app) | No |
| Requires account | Yes (Apple ID) | No |
| Live display during event | No | Yes |
| Photo limit | 5,000 photos | Unlimited |
| Upload friction | High (multiple taps) | Low (scan once) |
| Content moderation | No | Yes |
| Event-specific features | No | Yes |
Frequently Asked Questions
How do I create a shared album on iPhone for free?
iPhone Shared Albums are free and included with your iCloud account. Follow our step-by-step guide above to enable Shared Albums in Settings > Your Name > iCloud > Photos, then create a new shared album in the Photos app. However, be aware of the 5,000 photo limit and Apple-device-only restrictions.
How do I make a shared album on iPhone if the option is missing?
If you can't find the option to create a shared album, go to Settings > Your Name > iCloud > Photos and make sure Shared Albums is toggled on. You also need to be signed in to iCloud with your Apple ID. Once enabled, open the Photos app, tap Albums, tap the + icon, and select "New Shared Album." On older iOS versions the toggle may be under Settings > Photos instead.
How do I share a photo album on iPhone with non-Apple users?
The only way to share a photo album on iPhone with non-Apple users is by enabling the Public Website option in the shared album's People settings. This creates a web link anyone can view in a browser — but they still cannot upload photos. For events where you need both iPhone and Android guests to upload, use a cross-platform tool like Fotify where guests simply scan a QR code to upload from any phone.
How do I join a shared album on iPhone?
When someone invites you to a shared album, you'll see a notification in the Photos app under the Albums tab. Tap the invitation and select Accept. If the notification doesn't appear, make sure Shared Albums is enabled in your iCloud settings and that the invite was sent to the email associated with your Apple ID. You can also ask the album owner to resend the invitation.
How do I invite someone to a shared album on iPhone?
Open the shared album, tap the People icon at the top, then tap Invite People. Enter the person's Apple ID email or phone number and tap Add. They'll receive a notification to accept. You can have up to 100 subscribers per shared album. Only people with Apple IDs on Apple devices can be invited as contributors.
Can Android users add photos to an iPhone shared album?
No. Android users can only view iPhone Shared Albums through a web browser—they cannot upload photos. This means roughly 30-40% of event guests typically can't participate. If you need Android users to upload photos, you'll need a cross-platform solution like Fotify.
Why isn't my shared album working at my event?
Common issues include: guests not having Shared Albums enabled in iCloud settings, incorrect Apple ID setup, poor venue WiFi, or confusion about how to access the album during the event. Even when technically working, many guests find the multi-step upload process too cumbersome during a celebration.
How many photos can I put in an iPhone shared album?
iPhone Shared Albums have a maximum capacity of 5,000 photos and videos combined. Videos are limited to 15 minutes each. For large events that might exceed this, consider dedicated event photo sharing platforms with unlimited capacity.
Can people without iPhones see my shared album?
Yes, non-iPhone users can view your shared album through a web browser if you enable "Public Website" in the album settings. However, they cannot upload their own photos to your album—only Apple device users with Apple IDs can contribute photos.
What's the easiest way to collect wedding photos from guests?
The easiest method is QR code photo sharing for weddings. Display a QR code at your wedding that guests scan with their phone camera (iPhone or Android). They're taken directly to a wedding photo upload page where they can instantly share photos—no app download, no account needed, no configuration required. See our full guide to the best wedding photo sharing apps.
Do guests need an Apple ID to view my shared album?
To view a shared album, no Apple ID is required if you enable the Public Website option—anyone with the link can browse photos in a web browser. However, to upload photos to your shared album, guests must have an Apple device and be signed in with an Apple ID. This creates a significant participation barrier at multi-platform events.
Can I download all photos from a shared album at once?
Yes, but only on a Mac or through iCloud.com. On iPhone/iPad, you must select photos individually or in batches. For events with hundreds of photos, this becomes tedious. Event photo platforms like Fotify offer one-click bulk downloads of all photos after your event.
Is there a better alternative to iPhone shared albums for events?
Yes. For events like weddings, parties, and corporate gatherings, QR code event photo sharing is significantly better than iPhone shared albums. Guests scan a code with any phone (iPhone or Android), upload through their browser, and photos appear on a live display instantly. No app download, no Apple ID, no setup. See our comparison of the best photo sharing apps for parties for detailed reviews.
Make Your Event Photo Collection Actually Work
iPhone Shared Albums serve a purpose for small-group, long-term photo sharing among Apple users. But for live events where you want everyone to participate, they create more frustration than memories.
Modern event photo sharing removes the barriers—no app downloads, no account requirements, no platform restrictions. Just scan and share.
Ready to collect photos the easy way? Start your free event and see why thousands of event hosts have moved beyond the limitations of iPhone Shared Albums. Your guests will thank you for making it simple.
For more tips on maximizing photo collection at your event, check out our ultimate guide to live event photo sharing and learn how to share live photos at your event.
Make photo collection effortless at your next event with Fotify. QR code sharing, live displays, unlimited uploads—no app required.
Related Pages
Discover how Fotify can transform your events